
Here is an overview of my endeavors to recreate the fashions of the Empire style (cir. 1790 - 1830) I had for a long time wanted to work on such a project and found the stimulus in an annual theatre banquet for the Pepperdine University Theatre Department. The theme in 2007 was fairy tales. I decided to do a rendition of Rumplestiltskin in just such a style. My ultimate goals in this project were to recreate, as best I could, the quality of hand-made historical garments of this period, true to cut and silhouette, as well as to evoke a quality of Germanic folk dress (out of respect to the Brothers Grimm who famously compiled their volumes of German folk stories, of which Rumplestiltskin belongs, in this very time-period [1815]) through earthy colours and the use of embroidery. I ultimately wanted a sense of "crude" charm, like a heritage quilt.
I already had made, simply for the sake of experience and interest, the breeches and shirt. The shirt is from the "Kannik's Korner" pattern No. 4102: "Man's Shirt 1790-1830." It is a square cut shirt, meaning all pattern pieces are cut in perfect rectangles along the straight of grain precisely as they were historically. Shaping and ease of wear is achieved through gussets and gathering as opposed to shaping through seam lines as is the practice today. It is made of a fairly fine weave 100% linen which was bought from a commercial fabric/crafts store. It is not as fine as shirt linen would have been and should be but this was the best I could find locally for a fair price. The shirt is largely hand stitched except for the longer straight seams (sides, sleeves etc.). The ruffle along the breast opening is hand rolled along the edge and hand stitched/gathered to the shirt opening. You can somewhat see the shoulder guard or binder which is hand stitched to the inside of the shirt in some of the pictures where the shirt sleeves are exposed. This piece is used to bind up the seam allowance in the shoulder and add to durability. The only straying from the pattern I indulged in is the collar. The pattern calls for a very wide rectangular collar that is meant to fold double over whatever neckwear is used. I drafted my own pattern for the collar, shaping it around the neck so that it could stand comfortably erect, as you can see in the photos.


The cravat seen above on the mannequin is a length of linen cut on the straight of grain, not the bias, hand rolled at the edge. It is centered at the front of the neck, each end wrapped around back and to the front again ending in a knotted bow. The red tie seen below in the banquet photo is cut on the bias and therefore did not need to be rolled on the edge and tied in a similar fashion as the white linen.
The breeches I adapted partially from Kannik's Korner pattern No. 4303: "Men's Trousers high-waisted 1790-1810" and an "Eagle's View" pattern for broadfall drop front breeches. They are essentially the same style of garment from the same general period; the main differences being the height of the rise in the waist and the length of the pant legs (KK pattern being high-waisted with long straight trouser legs, the "Eagle's View" being knee length breeches with a short rise). As I wanted to go for an earlier point in the Empire style I needed a lower rise waist and breeches fastening at the knee; I wanted to utilize, however, the details provided in the KK pattern, mainly the buttoned side pockets and the watch-pocket set into the wide waistband. I therefore combined from the two the elements I wanted and drafted my own pattern. In addition I had to further shorten the rise and leg length considerably to accommodate my height and build. The material is a brown satin that has some stretch to it which certainly helps with ease of wear although they did not have lycra in the early 19th century. This type of breeches, however, were often made of buck-skin which provided some chamois-like give. Otherwise they were often cut on the bias of the fabric (wool, silk, etc.) to allow them to be as tight as possible per the reigning style while still allowing range of movement. The seat is cut very full and gathered as was the practice in the period and is tied with lacing in the back of the waistband for adjustment. The front opening is a broadfall drop that buttons at each side point and in the middle. The side pockets button to the waist band; I extended the points of my pockets beyond what was given in the KK pattern as I found it gave a more striking and interesting appearance. The breeches button at the knee with a knee band closier with a buttoned placket up the leg to the knee. All button holes are hand stitched. The buttons are half-balls covered with self fabric.
These are some chief images of reference and inspiration for my concept of this costume. Especially note the profusion of clean white linen at the neck, the revers of the waistcoats and the cut of the tailcoat.

With the decision to complete this costume for the banquet, I needed a tailcoat and waistcoat. Although, as far as "Rumplestitskin" was concerned, the nature of the cut and construction for these two final garments was of a lesser concern than the overall silhouette and general "fantasy" of their look, I was determined to make them as authentic to the Empire style as I could manage. In short, I wanted a high waisted cutaway tail-coat with broad lapels and a high, folded collar. I was particularly interested in the idea of button-holes going from the waist all the way up the lapel on either side, buttoning up both with very large self-covered buttons. For the waistcoat I wanted a fine-embroidered look with a high collar and free standing revers to extend out from the coat lapels, framing the ruffling and cravat.


 The coat is lined throughout even down through the tails. Coats of the period often were not lined completely for various reasons, economic frugality being one of them. Most often they seem to have also been left with the raw cut edges (as opposed to the modern standard of facing and hemming all edges) due to the fact the fabric at that time was much denser in weave, of a general higher and harder wearing quality, and often fulled. This of course refers to woollens. Coats made of cotton/linen or silk (or any fabric that ravels) would have bound edges.
I already had made, simply for the sake of experience and interest, the breeches and shirt. The shirt is from the "Kannik's Korner" pattern No. 4102: "Man's Shirt 1790-1830." It is a square cut shirt, meaning all pattern pieces are cut in perfect rectangles along the straight of grain precisely as they were historically. Shaping and ease of wear is achieved through gussets and gathering as opposed to shaping through seam lines as is the practice today. It is made of a fairly fine weave 100% linen which was bought from a commercial fabric/crafts store. It is not as fine as shirt linen would have been and should be but this was the best I could find locally for a fair price. The shirt is largely hand stitched except for the longer straight seams (sides, sleeves etc.). The ruffle along the breast opening is hand rolled along the edge and hand stitched/gathered to the shirt opening. You can somewhat see the shoulder guard or binder which is hand stitched to the inside of the shirt in some of the pictures where the shirt sleeves are exposed. This piece is used to bind up the seam allowance in the shoulder and add to durability. The only straying from the pattern I indulged in is the collar. The pattern calls for a very wide rectangular collar that is meant to fold double over whatever neckwear is used. I drafted my own pattern for the collar, shaping it around the neck so that it could stand comfortably erect, as you can see in the photos.


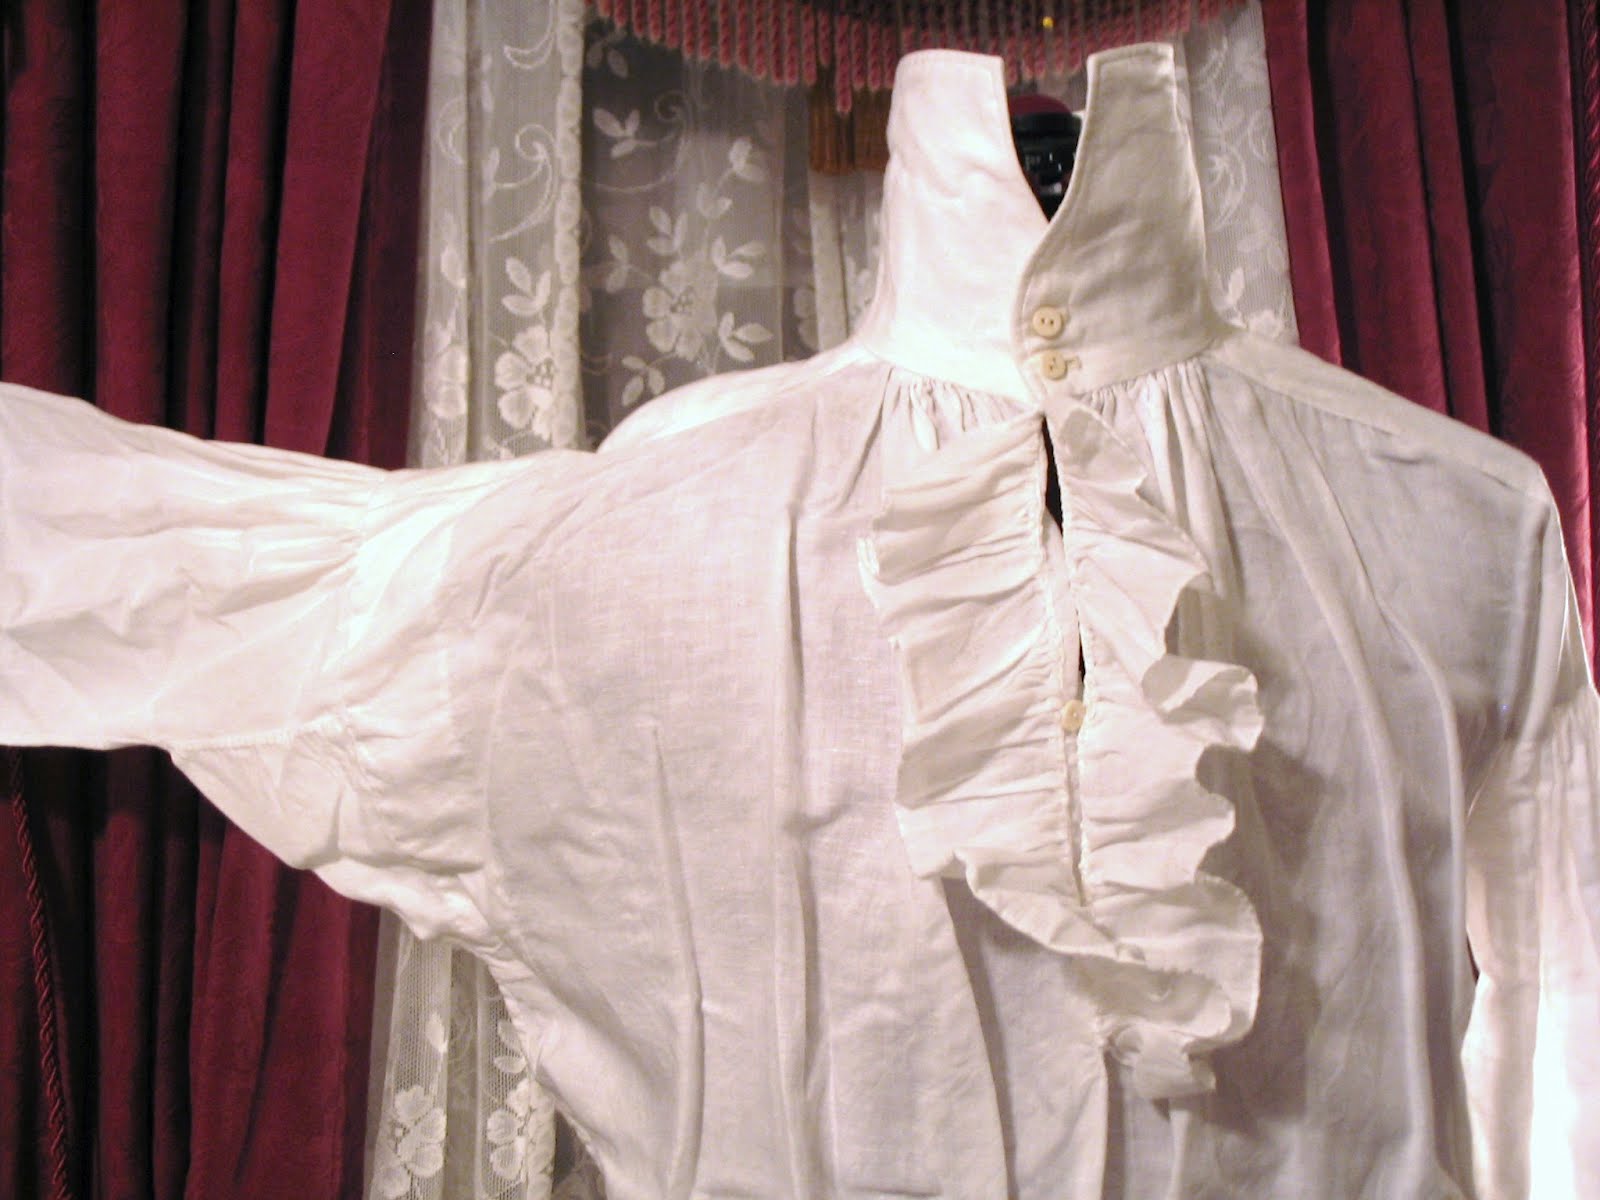

This shows a traditional square cut shirt. The collar and placket is of a later style but these shirts changed very little over 300+ years.
The cravat seen above on the mannequin is a length of linen cut on the straight of grain, not the bias, hand rolled at the edge. It is centered at the front of the neck, each end wrapped around back and to the front again ending in a knotted bow. The red tie seen below in the banquet photo is cut on the bias and therefore did not need to be rolled on the edge and tied in a similar fashion as the white linen.
The breeches I adapted partially from Kannik's Korner pattern No. 4303: "Men's Trousers high-waisted 1790-1810" and an "Eagle's View" pattern for broadfall drop front breeches. They are essentially the same style of garment from the same general period; the main differences being the height of the rise in the waist and the length of the pant legs (KK pattern being high-waisted with long straight trouser legs, the "Eagle's View" being knee length breeches with a short rise). As I wanted to go for an earlier point in the Empire style I needed a lower rise waist and breeches fastening at the knee; I wanted to utilize, however, the details provided in the KK pattern, mainly the buttoned side pockets and the watch-pocket set into the wide waistband. I therefore combined from the two the elements I wanted and drafted my own pattern.
In addition I had to further shorten the rise and leg length considerably to accommodate my height and build. The material is a brown satin that has some stretch to it which certainly helps with ease of wear although they did not have lycra in the early 19th century. This type of breeches, however, were often made of buck-skin which provided some chamois-like give. Otherwise they were often cut on the bias of the fabric (wool, silk, etc.) to allow them to be as tight as possible per the reigning style while still allowing range of movement. The seat is cut very full and gathered as was the practice in the period and is tied with lacing in the back of the waistband for adjustment. The front opening is a broadfall drop that buttons at each side point and in the middle. The side pockets button to the waist band; I extended the points of my pockets beyond what was given in the KK pattern as I found it gave a more striking and interesting appearance. The breeches button at the knee with a knee band closier with a buttoned placket up the leg to the knee. All button holes are hand stitched. The buttons are half-balls covered with self fabric.


These are some chief images of reference and inspiration for my concept of this costume. Especially note the profusion of clean white linen at the neck, the revers of the waistcoats and the cut of the tailcoat.
With the decision to complete this costume for the banquet, I needed a tailcoat and waistcoat. Although, as far as "Rumplestitskin" was concerned, the nature of the cut and construction for these two final garments was of a lesser concern than the overall silhouette and general "fantasy" of their look, I was determined to make them as authentic to the Empire style as I could manage. In short, I wanted a high waisted cutaway tail-coat with broad
 lapels and a high, folded collar. I was particularly interested in the idea of button-holes going from the waist all the way up the lapel on either side, buttoning up both with very large self-covered buttons. For the waistcoat I wanted a fine-embroidered look with a high collar and free standing revers to extend out from the coat lapels, framing the ruffling and cravat.
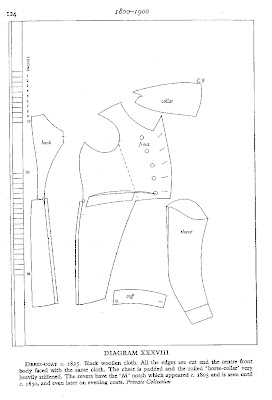
There are a few commercial patterns out there that stab at the period's clothing for men. Butterick 3648 is a noble attempt at both a high-waisted tail-coat and fall-front trousers but I found it too modern in its cut and too amalgamated from varying time periods. McCall's 4890 has an interesting variety of waistcoat styles that could be adapted to authenticity, but, again, are extremely simplified in cut and grossly abbreviated in it's sizing like so many modern commercial patterns. One of the elements of this period that always struck me was the precision of fit (which I will delve into deeper below) and I wanted to recreate that with mine.  I ended up referencing, however, several costume history/pattern cutting guides to draft my own; chiefly I utilized "The Evolution of Fashion 1066 - 1930" by Margot Hamilton Hill and Peter A. Bucknell which has some very neat but simplified line drawings of basic pattern pieces for each major fashion trend in the outlined period and "The Cut of Men's Clothes 1600 - 1900" by Norah Waugh which, along with the "women's cut" companion book is fabulously detailed and thorough both in illustration and documentation.
I ended up referencing, however, several costume history/pattern cutting guides to draft my own; chiefly I utilized "The Evolution of Fashion 1066 - 1930" by Margot Hamilton Hill and Peter A. Bucknell which has some very neat but simplified line drawings of basic pattern pieces for each major fashion trend in the outlined period and "The Cut of Men's Clothes 1600 - 1900" by Norah Waugh which, along with the "women's cut" companion book is fabulously detailed and thorough both in illustration and documentation.

Once I had cross referenced all my sources and drafted several roughs I came up with patterns I felt I could not only be happy with the final look, but also practically construct (most overview pattern books only provide major pattern pieces, not facings, interfacings/padding, pockets, linings etc. and don't necessarily provide construction instructions as modern commercial patterns do; all of these things must be researched and/or devised). With these things completed, I unto the breach went and began cutting fabric!

I made the coat first. I used a green on green corduroy which I found at Wal-Mart of all places on the $2 sale rack. I was drown to the vibrancy of the colour as well as the bold stripes of the wale which reminded me of the multi stripped silk coats of the French Fops and Macaronis of the Revolutionary period. It was 100% cotton so I firstly washed it all in hot water to bleed out any excess dye, pre-shrink, and attempt to get that Wal-Mart smell out of it...not easy to do. The underside of the corduroy is a very obnoxious bright lime green, the cord wale a dark forest-like green. I was a little apprehensive using it due to the brightness of the lime undertone but I believe it, once made up, to have a very interesting and appropriate look. The lining is a lime green lightweight taffeta; the cuffs and collar a dark brown moleskin suede.
 The coat is lined throughout even down through the tails. Coats of the period often were not lined completely for various reasons, economic frugality being one of them. Most often they seem to have also been left with the raw cut edges (as opposed to the modern standard of facing and hemming all edges) due to the fact the fabric at that time was much denser in weave, of a general higher and harder wearing quality, and often fulled. This of course refers to woollens. Coats made of cotton/linen or silk (or any fabric that ravels) would have bound edges.
Note: the cuff has a working placket with hand sewn button holes and buttons covered with ribbed satin.
The sleeves consist of two pieces and accommodate the bend of the elbow as was customary at the time (and is far less today). The sleeve cap is very full and is gathered into the armseye rather than eased like modern tailored sleeves. This provided not only the very distinctive "leg of mutton" look which accentuated the fullness of the chest juxtaposed to the tightened waist, billowing back out to a full hip (indeed this was one of the most feminine periods in men's fashion and was often referred to as "the wasp" silhouette) but also a relatively wide range of movement in the arm while keeping the armseye at the shoulder joint. A generation earlier (i.e. American Revolution and Louis XVI) the armseye extended back into the shoulder blade to accommodate range of movement. Keep in mind that this period is still very early in the development of advanced tailoring techniques. Rather than heavily structuring the inside of the garment with interfacings, paddings and canvases like the Victorians developed and modern tailors still utilize to this day, 18th and early nineteenth century tailors used the body as the primary structure to a garment, cutting it rather close fitting. Aside from using gussets, to provide range of movement in the arm you either needed a wider armseye (like the 18h century coats) or a fuller sleeve cap (like in the Regency and Empire period I recreated here). This issue of utilizing the body as structure rather than "hiding" it within a shell, is also at the root of why the shoulder seam (of both periods end even all the way through the early 20th century) falls down the back over the shoulder blade rather than straight across the shoulder like in modern coats. As the 20th century progressed this seam slowly moved it's way up the back in corrolation to the increase of internal structure within the coat's construction. Modern coats are cut quite a bit loser than those of the 300 years prior; this is made possible through the use of extensive internal structure. Coats of the period dealt here did not even have shoulder pads and neither does mine. On the contrary, though, much padding was (and is) used in the chest to inhance the "wasp" effect. I used relatively cheap quilters batting for this as I was under budgetary constraints. This synthetic fiber padding is by no means ideal as it is too fluffy and light but cheap none-the-less.
 Keep in mind that this period is still very early in the development of advanced tailoring techniques. Rather than heavily structuring the inside of the garment with interfacings, paddings and canvases like the Victorians developed and modern tailors still utilize to this day, 18th and early nineteenth century tailors used the body as the primary structure to a garment, cutting it rather close fitting. Aside from using gussets, to provide range of movement in the arm you either needed a wider armseye (like the 18h century coats) or a fuller sleeve cap (like in the Regency and Empire period I recreated here). This issue of utilizing the body as structure rather than "hiding" it within a shell, is also at the root of why the shoulder seam (of both periods end even all the way through the early 20th century) falls down the back over the shoulder blade rather than straight across the shoulder like in modern coats. As the 20th century progressed this seam slowly moved it's way up the back in corrolation to the increase of internal structure within the coat's construction. Modern coats are cut quite a bit loser than those of the 300 years prior; this is made possible through the use of extensive internal structure. Coats of the period dealt here did not even have shoulder pads and neither does mine. On the contrary, though, much padding was (and is) used in the chest to inhance the "wasp" effect. I used relatively cheap quilters batting for this as I was under budgetary constraints. This synthetic fiber padding is by no means ideal as it is too fluffy and light but cheap none-the-less.
Note that there are flap pockets set in at the waist of both hips. The tails have a pleated seam where the tail meets the center back body and is vented at senter back. I used 1 7/8 inch flat cover buttons for all the buttons on the body of the coat including those over the back pleats.
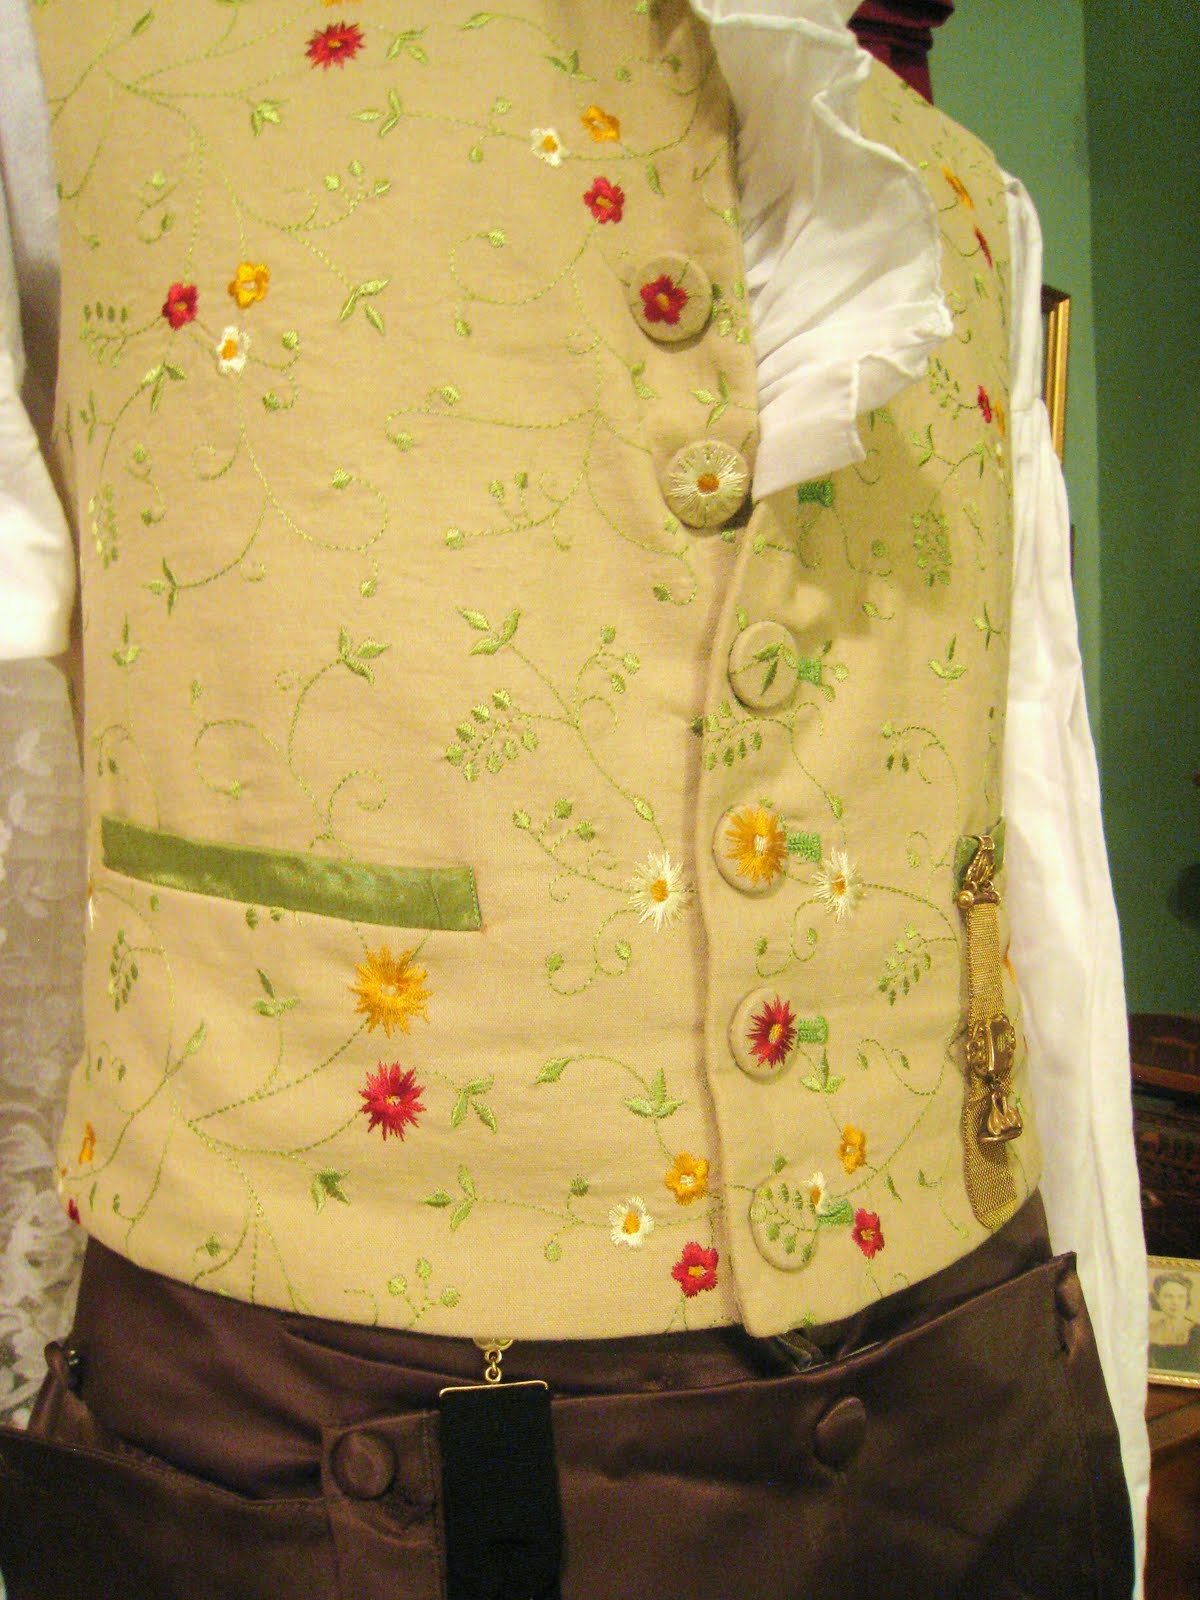
 For the waistcoat I used a greenish tan 100% linen material with a machine embroidered floral motif which I purchased from a local commercial fabric store. Limited as I was of place, time, and money, I wanted the this to come as close to the exquisitly embroidered waistcoats of the 18th and early 19th centuries as possible. I was immediately drawn to thie fabric as it fit my criteria of being fully embroidered and I really loved the pop of the colors (red, yellow, white and green). My other goal of evoking the essence of germanic folk dress I felt was sufficiantly met as well. The colours and floral motif reminded me of Bavaria.
 The button holes, again, are hand sewn using a lime green cotton pearl embroidery yarn. For the buttons I used 7/8 inch flat covered buttons, positioning the material in such a way as to utilize the embroidered flowers.


 For the waistcoat I used a greenish tan 100% linen material with a machine embroidered floral motif which I purchased from a local commercial fabric store. Limited as I was of place, time, and money, I wanted the this to come as close to the exquisitly embroidered waistcoats of the 18th and early 19th centuries as possible. I was immediately drawn to thie fabric as it fit my criteria of being fully embroidered and I really loved the pop of the colors (red, yellow, white and green). My other goal of evoking the essence of germanic folk dress I felt was sufficiantly met as well. The colours and floral motif reminded me of Bavaria.
The waistcoat is cut along similar lines of the coat as it fits very snug to the body and the shoulder seams fall toward the back. The collar is designed to stand up and the revers to project out, framing the ruffles and cravat as was popular in this period. It was even common to wear more than one waistcoat at a time to fully exploit this effect. The front is conventionally self faced while the collar is faced with the same green taffeta as the coat lining. You will note that the pocket welt is of this as well. The front lining utilizes this same material as well while the back is lined with a light polished cotton and the back is of a cotton twill. I devised the back lacings in accordance with the custom of the times, using cotton twill tape for the laces.


 The button holes, again, are hand sewn using a lime green cotton pearl embroidery yarn. For the buttons I used 7/8 inch flat covered buttons, positioning the material in such a way as to utilize the embroidered flowers.

Here I am in it. I made the hat and the stockings as well but that's another story. I'm tired of writing this. That's my wife, at the time my girlfriend, and she put her whole dragon costume together all by herself and I think she's pretty darn cute!


